Showing posts with label Home Decor. Show all posts

Wednesday, May 31, 2023

Why You Should Always Grab Glass Jars at Thrift Stores & The Many Ways to Use Them


I know I keep saying that I'm in my thrifting era as if it's a new thing, but I've been a thrifter all my life. I can conjure memories of walking through the Salvation Army with my mom at young enough ages that I don't remember much else. And garage sales were a regular past-time through my childhood. I loved going to them with my Grandma and getting some Tim Horton's while we were out - collecting little treasures for no more than a few quarters. 

The things I look for and the places I hunt have changed over the years, and in all my phases I never used to look at any sort of glassware. Now it's one of my favorite things to find! Partially because it can be quite inexpensive while being either useful or gorgeous (or both!), but also because there's a lot of sweet vintage pieces and even some valuable surprises out there!


In my experience, you can expect to pay anywhere from $.25 to $10 for a piece - the first price most likely at a garage sale, the second at an antique store, and the thrift stores fall somewhere between. Depending on your goals, there's something affordable out there for basically every budget.

So, you might be wondering...

What Types of Things Should I Grab?


My thrifting motto is that if it gives you a little thrill when you see it, that's enough rationale. With the cost being so low, what real damage is a $.99 treat yourself? Especially if you're saving something (that potentially has its own history!) from a landfill and filling a need or want in your home. 

The thing about thrift stores is that they only have one of each gem (usually), and if it's pretty...it won't last. I sometimes see things hang around for a bit, but usually only if they're overpriced. If you love something and don't grab it right away - you might immediately miss your chance. Like...to the cart behind you, even.

I like to grab: 
  • the large-sized mason jars (bonus points for the flip top and vintage ones)
  • glass canisters that have air-tight lids
  • old looking milk bottles
  • intricate glass bottles
  • unique milk glass (some of the vases are a dime a dozen so I usually pass on those - though they do come in handy for gifting flowers!)
  • pretty vases, if they're something I don't already have shape/size/style wise
  • kitschy holiday drinkware (because they're fun!)
  • while this isn't actually glass: unique mugs. They're ceramic, obviously, but they're usually on shelves together and I'm a sucker for a mug. I'll only grab one for drinking if it's absolutely gorgeous (I just have too many), but sometimes one will scream "I'm a cute little vase!" or "I'm actually a planter!" at me and I'll get it for that.

Even when I put myself on a glassware buying ban, I'm such a sucker for a blue mason jar. I can't help it.

So, what should I do with these?


No joke: the possibilities are endless. There are so, so, SO many things around the house that need a container of some sort, and a secondhand glass piece is more affordable, sustainable, and beautiful than basically any other option out there. It's the trifecta of worthiness!!

I have a big list of the things I came up with off the top of my head, and some of them are quite specific because I plan to do them myself (and bought the perfect glassware for them, of course!) and I will come back to this post and link to the new posts I create as I get around to each one of those projects. Many are already in the works, so bookmark this and come back soon!

In the Kitchen:

  • Pantry Organization: dry goods, small snacks, pasta
  • Homemade Taco Seasoning (post coming soon!)
  • Sourdough Starter Containers (post coming soon!)
  • Refrigerator Pickles (post coming soon!)
  • Homemade Vanilla Extract (post coming soon!)
  • Dish Soap Dispenser (glass oil & vinegar containers are great for this)
  • Homemade Jam
  • Drinkware: cute vintage glasses, mason jars as glasses
  • Homemade Salad Dressing Storage
  • Spice/Herb Storage
  • Leftovers
  • Bacon Grease Storage (you can use it to cook with!)
  • Meal Prep Containers

In the Bathroom:

  • Makeup brush holder
  • Qtip Storage
  • Bobby Pin Storage
  • Toothbrush Holder
  • Hair tie holder
  • Homemade sugar scrub container

Around the House:

  • Votive Candle Holders (like in a mason jar, or other wide-mouthed glass container)
  • Vases
  • Loose Change Jar
  • DIY Disinfecting Wipes (post coming soon!)
  • Desk Pen Holder
  • Sewing Notions Container (buttons, pins, thread)
  • Homemade Candles
  • Store Matches for Candles or Fireplaces
  • Start Germinating Seeds in Them
  • Catch Fireflies, obviously
  • Make a TBR Jar for your Stack of Unread Books
  • Water Jar for Rinsing Paint Brushes (or store them in a jar)

I could go on and on because...basically anything that needs to be stored can go in a thrifted glass jar! I'm trying to get away from plastics myself (not entirely - I just don't have the discipline for that, but in every easily feasible way), and I love that thrifted glass jars are less expensive and more unique than anything I could get at a department store or online.

Before I set you loose to hunt for glassware at the thrift stores, here's a quick price guide:


$.10 - $1 for a thrifted Mason jar
$.50 - $2 for a small jar with lid/flip top
$1 - $3 for a bigger jar or glass container
$.50 - $3 for vintage/older glassware
$.50 - $3 for a pretty vase
$1 - $4 for a lidded/flip top glass container
$.25 - $2 for a mug

Keep in mind that your location and the type of place you're shopping will change this a bit, but this is *about* what I pay. Never go above $5 unless you're at an antique store! There are few exceptions. $6 or $7 isn't awful (especially at Goodwill - they are far more expensive than other thrift stores or garage sales), but only pay that if you truly love it and it's in very, very good shape. Don't settle at that price!

I have a lot of projects involving glass jars on my to do list (haha), so I'll see you soon with some of them! Happy thrifting! xo

Here's a pin so you can come back and see the projects I use my glass pieces for!


Friday, May 12, 2023

Easy Curb Appeal Update Project for Less Than $80!


As of this month, my family and I have lived in this house for 13 years. Which...is wild, because back when we found it we thought it would be a 5ish-year situation until we were ready to size up. The reasons for us staying here are many, but we've house hunted for a long time (at least 7 years now) without having the right situation come up for us. So instead (for now) we're loving on the house we have.

My vision for our space, which is a cozy 1950's ranch situated on a woody acre, is an updated suburban cottage. I jokingly say that I want our house to look like "a rich person's 3rd adorable vacation home that they go to when they they want to live like us peasants" - lol.

Meaning...cozy, cottagey, a little old-world and vintage, but updated and pretty. Curated. A little bit rustic with a sprinkling of luxuries. Shabby chic meets old world with old money. 

You get the vibe? I'm contradictory and unconcise as heck, so don't worry if you don't.

Last week, I kicked off a little curb appeal project that I've been cooking up for literal years. I was able to do everything I'm about to show you for less than $80 (I'll give you the cost breakdown towards the end!), and while it's nothing mind-blowing (or even finished), I am floored at the difference $80 can make!

I have a few pieces on the way to add to the whole situation, and I have plans to make a house number sign to hang by the front door (hoping to get the supplies this weekend!), so I'll update again when it's all finished. But here's what I did this past week:

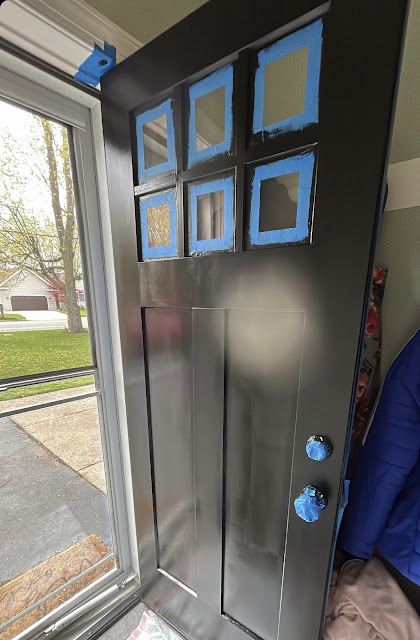
- Painted both front doors black (yes, we have two)
- Weeded the front landscaping, pruned, raked in bone meal & got it ready for new plants
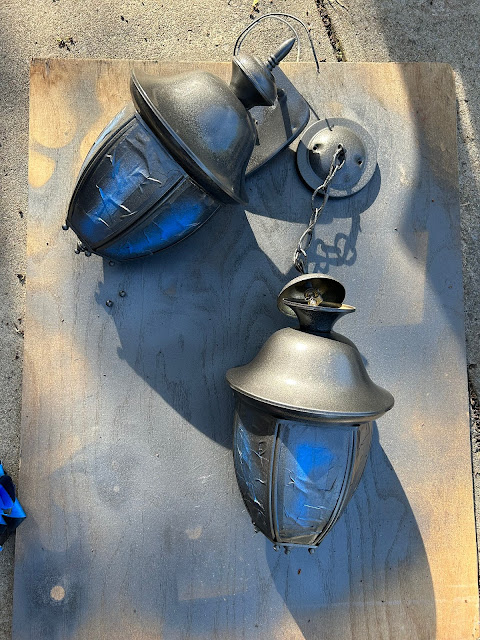
- Painted all three outdoor light fixtures on the front of the house
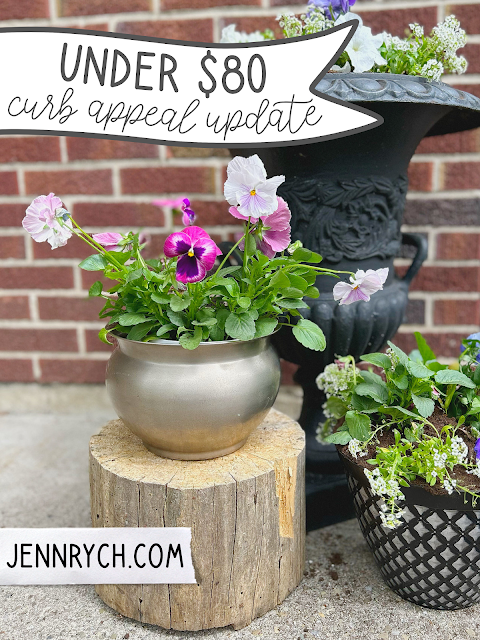
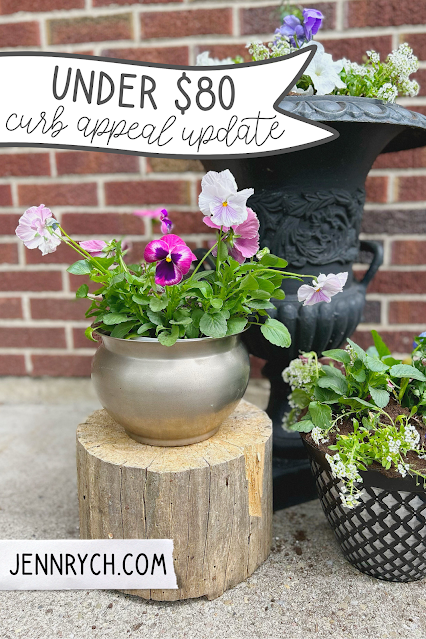
- Filled planters with flowers and decorated the front of the house
- Got a new welcome mat for the main front door
- Swept/weeded the driveway and little patio area, washed the doors inside and out

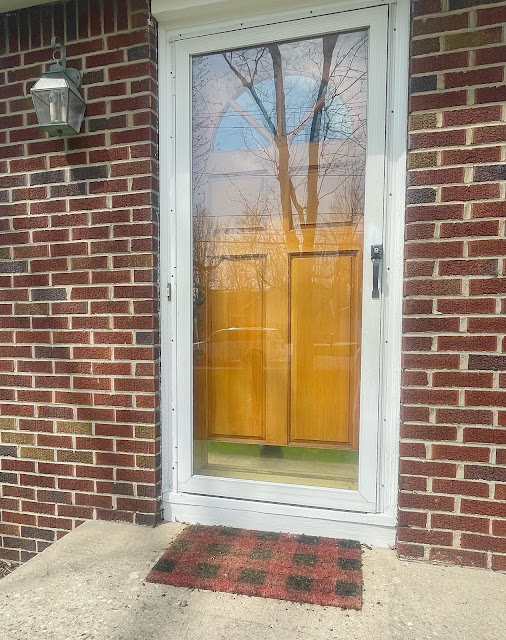
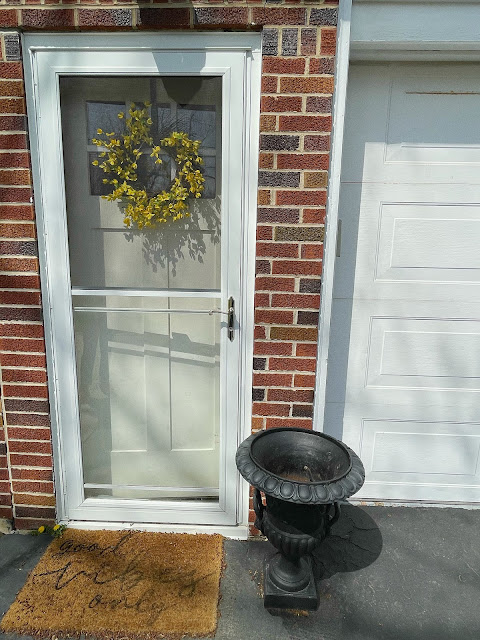
Here is what the doors looked like before I began:


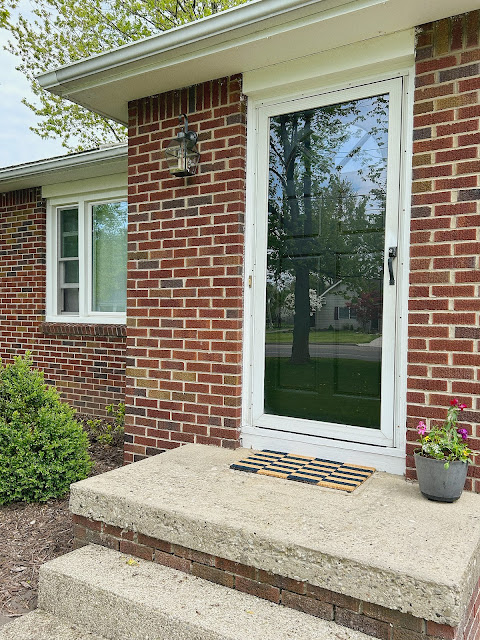
The door above is what I've been referring to as the "main" front door. 
This is the door that was intended to be used when the house was built.


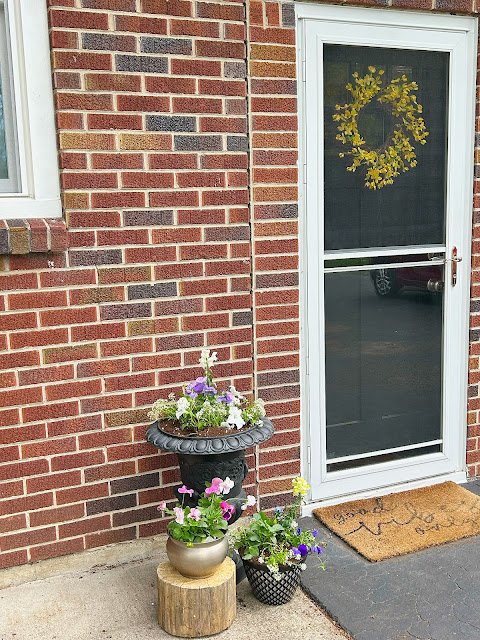
And this one is the "mudroom" door. It's part of an addition that was added
20-25 years ago that attached the existing house to the free-standing garage.

I haaaate the orange stain on the main door, and the mudroom door was replaced about a year and a half ago, and we never painted it! It's been primed and ready to go, but we just hadn't gotten around to it. Part of the hold up was trying to decide what color looks good against brick, and not being sure if we wanted to make things neutral or bring in some color. Narrowing down my goals for the look of our house and doing a lot of Pinteresting helped us land on black.

A quick trip to Lowe's and a convo with a super-helpful paint guy later, I had everything I needed to jump in. I annoyingly had to wait for rainy weather to pass (for like...5 days!), and then off I went.


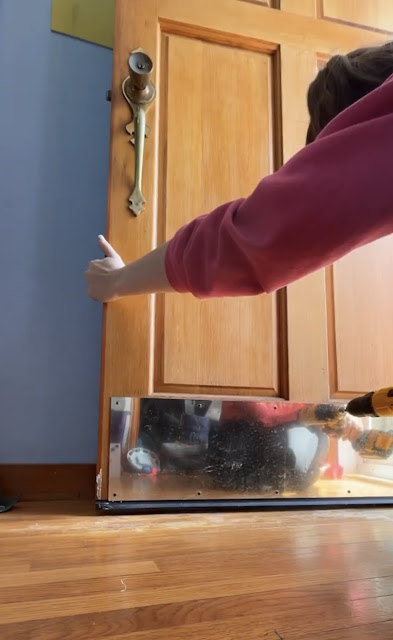
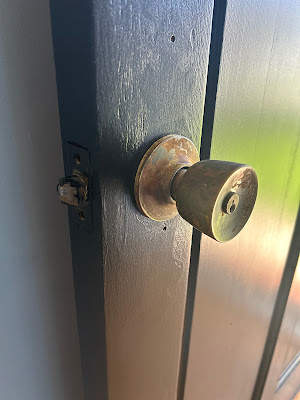
I started with the main front door because I couldn't stand the color and wanted it gone first! Prepping it didn't prove to be very difficult - the sun had already taken care of most of its finish! I washed it, took off the hardware, and lightly sanded it, and that was it!

My one regret: when I took off this kick plate, the finish was still very much in tact under it. I resolved to just put it back on at the end to mask the difference in how the paint would finish....but this paint was amazing and you can't tell at allllll! So much so that I didn't want to put the kick plate back on, and so I wish I'd filled the screw holes. Oh well.


The sun did a number on the hardware, too! This thing was just...demolished. It was difficult to get off (though I'd already gotten the decorative piece that goes behind it off, you can see it's still on in the photo above), but once I did I painted allll of it. I'd gotten this really awesome hammered finish rustoleum spray paint that can go right over rust (and prevents new rust), and it worked like a chaaaarm on this!

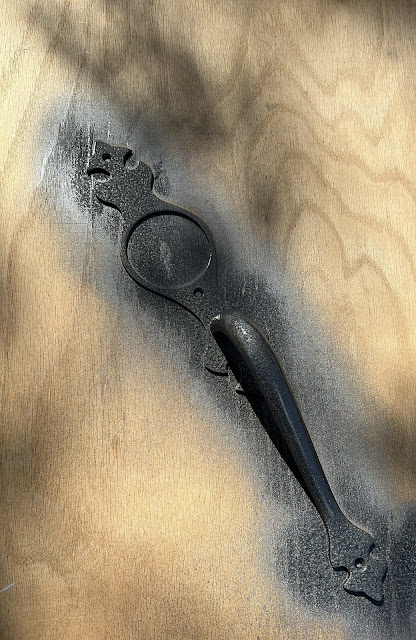
Here's just a quick before and after of the first coat of it on the decorative part of this:


Crazy, right? I swear to you, this is not an ad but it's going to sound like one because I cannot say enough about this paint! I'd gotten it for the light fixtures and didn't plan to use it on the door at all until I saw how destroyed the handle was. It did the job on literally everything I used it on, and I love how it looks! It painted all 3 outdoor light fixtures (probably a good 3 coats each) and the door handle (probably also 3 coats) for a $10 can of spray paint. And now everything looks brand new. Amazing!

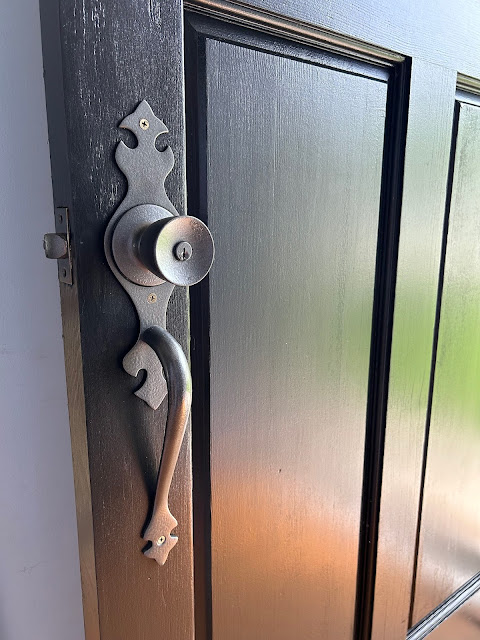
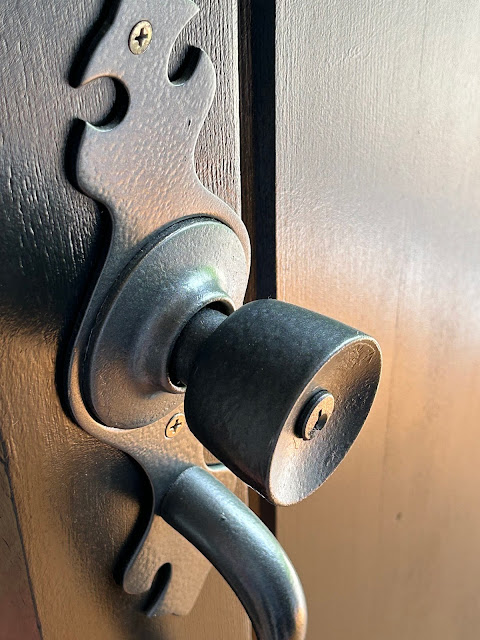
Look at the handle now!


Did I realize after the fact that I should have painted the screws as well and think about it constantly now? Yeeep. But let's instead focus on the incredible difference!

Painting the outdoor lights and weeding the front landscaping happened in many steps that took all weekend to finish - between coats of drying paint and attempting to remember to stop and eat and all of that. It required A LOT of taping to make sure that the spray paint only went where I wanted it to, so I watched through basically all of Emily in Paris while that went down.


But, ugh, it was allll worth it when I started to see these suddenly looking brand new! I really have no idea how old these light fixtures are - the house was built in 1953, but was pretty heavily renovated 2 owners ago (which would have been the 80's or 90's). So I really don't know, but they were beat and desperately needed this refresh.

When the light fixtures were finished enough for Matt to re-hang them, I moved onto the second door.


This took an entire Sunday and all the episodes of the new Bridgerton series (the Queen one) to finish. But I think it turned out great, and I was soooo glad to have it finished! And the show? Well, I could have done without all that torture, but the ending hit me right in the feels. 

The project paused there - I needed to wait for a trip to get flowers and gathering some other supplies, and yesterday I got a bit farther on the project. Enough to share it, though as I said...there's still some missing pieces. But the overall impact so far makes me SO happy!

Here's the after:


Sooo much better! She's still missing the layering rug to go under that welcome mat (coming soon!) and the house number sign that will get hung right below the light fixture.


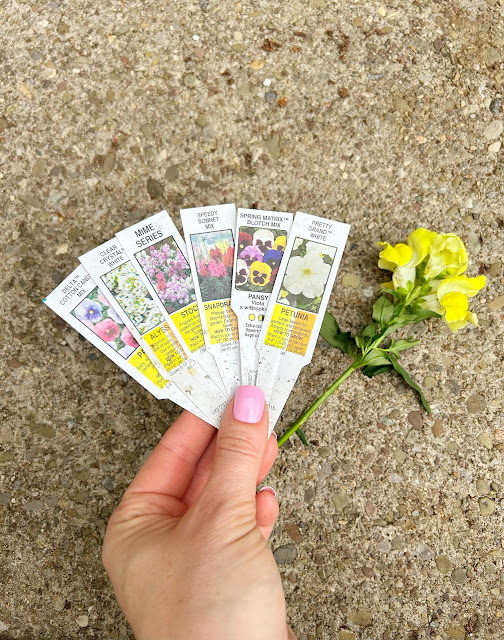
I'm so happy with it! BTW, here are the flowers I used in my planters:


Ready for the cost breakdown? I added links, too!


Rust-Oleum Door Paint Advanced Dry, Satin Black - $23 for 1qt at Lowe's

Rust-Oleum Matt Black Hammered Spray Paint - $9.98 at Lowe's

Welcome Mat - $7 at Target

Flat of Flowers - $19.99 (from Lavocat's)

Bag of Organic Potting Mix - $13.99 (used about 1/3 of it)

Pewter Planter - $3.99 at Salvation Army

Black/Pewter Planter - $1.25 at Dollar Tree

Black Iron Urn Planter - Free (Matt's mom gave it to us)

Wood Stump - Free (From our backyard!)

Total Cost: $79.20 (plus tax)


I know it's simple, but I love pulling up to the house to see these little updates, and to think that it was so inexpensive and uncomplicated! I wish I'd done it sooner!

More to come! Happy weekend!! :)


Monday, May 1, 2023

Stop Wasting Money on Wilting Bouquets! Learn How to Arrange Your Fresh Flowers Like a Pro & Make Them Last


Fresh flowers add so much coziness and cheer to my house (and...distract visitors from the messes, score), but they can be tricky. There's nothing worse than the "grocery store bouquet jammed in anything that holds water vibe"...except maybe when they die a few days later and your table is empty and boring again.

But we can fix that!

The Ultimate Florist-Backed Guide to Fresh Flower Arrangements! The photo features a yellow and white flower arrangement in a large vase, styled on a kitchen table.As someone who loves keeping fresh flowers in my home, I've learned a few tricks over the years that I've confirmed with an actual florist! Yep - I have an in. One that I can text 24 hours a day with all of our burning floral questions.

(She'll 100% ignore me if the text comes through at 3am, but I can still send it. Not that I have 3am flower questions, but she's my little sister sooo, bugging her is kinda my job.)

I made her answer at least 50 questions last week so that I could come up with some amaaaazing flowery resources for all of us to utilize! She was such a good sport, and gave me SO much to work with.


I thought we'd start with the things we all want to know:

How do I make my flowers look amazing without spending too much, and how do I keep them alive as long as possible?

Thanks to Gabbie (my sister!), I've got the answers for you!

Let's do it.


1. Picking Fresh Flowers

So, Gabbie is a Floral Team Leader for a popular local grocery store. She runs her department, so she has a front row seat to all of us picking out fresh flowers for our kitchen tables and party decorations every week. She's been doing this for years now, and has a few pointers for us!

  • There are, of course, ready-made bouquets that have been professionally styled available, but you can also build your own bouquets with a few bundles of individual flower types. If you go this route, aim for some variety, but be careful when mixing contrasting colors. If you want to mix things on opposite sides of the color wheel, do it with more muted tones.

    (When I do this, I pick about 3-4 flower types with 2-3 of them in shades of the same color, and one that either compliments or contrasts, but subtly!)

  • How to make bouquets with flowers of different sizes look more cohesive. The photo shows an arrangement of sunflowers and red roses, blended together with white hydrangeas.
    Keep flower size in mind, too! Gabbie says that if you want to put two flowers together that are quite different in size (such as roses and sunflowers, for example, which is apparently a common request), you need to add a filler that meets them in the middle size-wise to make it look more cohesive. A suggestion she threw out for the example above is hydrangeas, and she even sent me a photo of this so I could show you - love!

  • It's hard to tell how fresh most flowers are (other than obvious wilting), but there is a little test you can do with roses to check. Give the base of the flower head (right where it connects to the stem) a little squeeze with your fingers. A new fresh rose will feel hard and tight. If it’s losing elasticity, it’ll be soft and is past its peak.

  • If you're looking to keep costs down, avoid larger blooms like lilies, sunflowers, gerbera daisies, and roses. Love what you love, of course! But perhaps lean towards only one larger bloom and filling out your bouquet with smaller ones. If you're after roses specifically, standard red bouquet roses are likely your most affordable option. (And psst: the florists probably aren't so invested in the meanings of rose colors, so if you're wondering about symbolism Google is probably your best bet!)


2. Pick the Right, Clean Vase


Okay, so you've got your flowers - now what? Hopefully you have a few vases to chose from so you have one that works for your bouquet - it needs to be big enough to give your flowers breathing room, but not so big that they float around in there without any style. If you shove a bouquet into a vase that’s too small, it’ll look too tight, and it will promote mold that kills them quicker and may make them stinky. If you pick a really big one with a super-wide opening, your flowers will just flop! Try a few out for size until you find what you love, and then give the one you pick a scrub.

Residue from previous flowers can cause bacteria to grow, which will shorten the life of your new bouquet. Rinse the vase with warm water and a small amount of bleach or vinegar to kill any bacteria. Then rinse thoroughly with water and dry. Ready to rock and roll!


3. Prep Your Vase & Water The Right Way


When you fill your vase, make sure you use cold water. This will keep your flowers from wilting, and encourage any buds or blooms that haven't fully opened yet to take their time and stick around longer. If your flowers came with plant food, go ahead and add it - but not the whole thing! Let's be honest: none of us are reading those tiny packets. But if you did, you'd find that one packet is meant for use in a full liter of water, so only mix in half of it (or even less). Adding too much will only make your water murky.

Next, grab some clear scotch tape. Pull off two long pieces, and tape them across the opening of your vase in a cross or plus-sign shape. You won't see the tape at all once your arrangement is finished since it's clear, but it will help you arrange your flowers evenly and give them something to lean on as you build up your bouquet. Genius!


4. You Have to Trim Your Stems, But Don't Use Scissors!


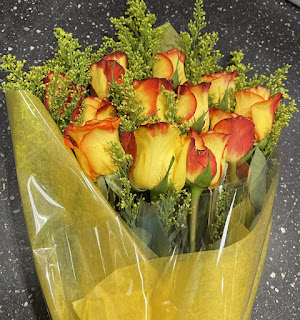
A simple bouquet of yellow roses with orange tipped petals.
According to Gabbie, any flower that has been removed from water must have at least 1/4 inch cut off the bottom of their stem before being arranged in their permanent vase. (BTW, she also said that you should never leave flowers out of water for more than three hours, so keep that in mind if you're transporting a bouquet you plan to gift!)

The thing is: you're apparently not supposed to use scissors to trim your flowers. Whoopsiiie. I didn't know this. They just aren't sharp enough, and despite making a fairly clean cut, the scissors are actually very slightly crushing the structure of the stems. This means that they won't efficiently draw up water, and they won't last as long as they could. This was actually Gabbie's number one tip for getting a longer life out of flowers: use garden shears! And she also said it doesn't actually matter if you cut them at an angle or not (gasp! who knew!) - she hasn't ever seen that make a difference. We've been lied to! lol


5. Arrange Stems in a Criss-Cross Layout


If you add the tape to your vase from my little tip above, this will sort of happen naturally. As you place flowers in your vase, angle their stems over and across each other to sort of interlock them under the water. This will help them support each other, and give your bouquet a more robust shape. It doesn't have to be perfectly done - just make sure you tip them in opposite directions and the stems will naturally do this. Scroll down to the end of this post for a peek at what this looks like - I made this arrangement out of a few bundles of flowers from the grocery store (daisies, lillies, and canterbury bells) before adding in daffodils from my own yard. Because I did my little tape trick, they did this little interlocking trick automatically!


6. Refresh Their Water


A few pink and white floral arrangements for sale at the grocery store.
When I bring flowers home and I notice them start to get a little wilty, I'll dump out their water, refill the vase with fresh, cold water, and add in the last of the plant food packet. What I didn't know, is if you do this every 3-4 days, you'll extend their lifespan and get more time with them. It seems obvious now, but it never occurred to me to do it sooner or more often. Who knew?


7. Bonus Tip: Don't Mix Daffodils & Tulips!


Never mix daffodils and tulips because they release pheromones that kill each other. I...had no idea. And probably could have easily done this (might have in the past??) because they both sprout up in my front yard in April and wanting to bring some outdoors in, they're all I have to chose from. But now I know. If I snip some of both, they're going in their own vases!


So - think you got it? Rushing out to the store right now to build a bouquet and watch it flourish? lol

I almost always have fresh flowers in the house - it's weird when I don't. I just love them so much! But I'm extra-excited to put Gabbie's tips to use for my next bouquet and see the difference!

Happy flower arranging to us all! :)


Pin all of this gold for future reference! :)


Friday, April 23, 2021

Full Living Room Reveal (+ links)

Ahh, she's finally done!

Well, kind of. As done as she's getting for the time being.

It won't be 100% done until I have time to paint the trim. The baseboards and hallway/doorway trim will eventually be a bright, crisp white - but the trim in this house is a solid 70 years old and needs A LOT of love before I can put paint on it. Which is an amount of work I'm not sure I'm up to while also draaaagging my kids through the last two months of virtual school. So that may be a Summer vacation project. I'll just have to re-share when the time comes!

Here we go!!! My long overdue living room refresh.


Living Room Update on a budget | www.jennrych.com


I was too excited and motivated (slash forgetful) to take a before picture, so here's one from Christmas:


living room before and after

I am SO happy with the change! Let me show you around ;)

So first of all is the wall color. I was hoping for something that appeared a bit more cream than this - it looks like bright white in person. I think once I finally paint the trim you'll be able to see a bit more of a difference, but I'm okay with it for now. As bright as it is, it still has some warmth to it. The color is called Pale Bloom by Valspar, and we got ours in Satin.


gray faux leather couch

living room shelf decor

This shelf used to hang a little bit to the left and it was stained with a random leftover stain we had when we moved into this place. Back then I had a toddler and no patience, haha. I painted it with a bright white paint and simplified the decor down to the things that fit my vision - whites, creams, greenery. I didn't plan to add the painting in the middle, but it was lacking something so I propped it up there as an example of what a mirror or artwork would look like there aaaand I kind of loved it. So she stayed, for now. I bought it at a garage sale years ago! The garland and such won't stay there forever - just spring decor.

Candles: Amazon | Plants: Hearth & Hand at Target (1 & 2)
Bunting & Wreaths: Bullseye's Playground at Target


This table makes me so happy for some reason! It's just bright and simple and lovely. When I ordered the lamps for the side tables I definitely thought they were bigger! But it's fine. I'd prefer bigger but I liked their style (and price!) so much that they're staying for now. However - the shades don't sit high enough to cover the bulbs, so when you'd sit near these lamps they were blinding. I remedied this by wrapping the base with electrical tape until it was thick enough that the shades could sit up higher. They're perfect now! 


target tulips, bullseyes playground faux florals in a crystal vase

The crystal vase belonged to my late Grandmother! I love that I found a way to display it all times! I noticed it in the background of a picture from my parents' wedding day recently, and while they're not still together (and haven't been for decades), I still love the history of this piece and I'm so glad to have it! I filled it with the beloved bullseye's playground tulips from Target and I love how it looks!

Brass Side Table Lamps: Target | Bunch of Tulips: Bullseye's Playground at Target


The recliner beneath my art gallery is also a new addition. Our old one was a dark red and a gift when our oldest son was born. It has served us well, but after twelve years and many little ones, the fabric was tearing and the stuffing was disintegrating in the arm rests. We'd ordered this one in early November but it didn't show up until March! We love it so far.


I call this wall our family gallery. Years ago (7 or 8?) I created a bigger, much more playful and colorful mural on this wall. I even blogged about the process. At the time, I had three itty bitty little ones and our house was very much so in "playroom" mode so I loved it at the time, but started to get annoyed with it after a while. I wanted it to be simplified and streamlined and a little more "grown up". So I played around with new layouts, spray painted all the frames a uniform bright white, and ordered new prints. I used gallery putty stickers to keep them straight and secure. The frames are a random collection from thrifting over the years, and I love how they look with different shapes and textures but all with one uniform color.

Photo Prints: Mpix | Gallery Putty Stickers: Amazon


This side table was already in the room, but I just simplified it a bit. The clock was a gift from my in-laws many years ago (when my oldest son was just a toddler and he loved all the dinging clocks all over their house). On the bottom is a faux fiddle fig from Target, and a soy Opalhouse candle (my favorite) and another bullseye's playground wreath (both from Target). The decor down there hides our Echo dot and one of our wifi routers. We had to get a double system because we have 3 kids doing virtual school & Matt working from home all at the same time!

Faux Fiddle Fig Plant: Target | Opalhouse Soy Candles: Target


art gallery wall with society6 and target

This wall! So much love here. This whole room was inspired by my bubblegum girl and it makes me SO happy to see her up on the wall! The rest of this was pieced together with random frames and things I had on hand (except for the hands canvas, that's new). The landscape watercolor was done by my late grandma (the same one who used to own the crystal vase), I made the Schitt's Creek quote print myself, the floral piece was another garage sale find from years ago, and the inspirational canvas I'd gotten maybe 4 Christmases ago and never hung up. Eek. Whatever, it has its home now, haha!

Quote Print: Target | Bubblegum Girl: Society6 | Hand Holding Canvas: Target


target drum lampshade

So, trying to keep things on a budget while updating this room, I tried to find ways to use what we already had and just adjust it to fit the new look. We'd had this stand lamp for years, and while its style isn't exactly perfect, I knew we could make it work by just changing out the lamp shade. I found one that coordinated really well with the side table lamps at Target, and it was SO easy to install and looks so great! And the bright light that comes out of it now is incredible!

Large Drum Lamp Shade: Target


faux ficus

The final piece of the update puzzle was finding a plant to go behind the love seat. I really, really wanted this one from Target, but I couldn't find it in stock anywhere. After struggling to find a faux fiddle fig that didn't look like it was shellacked, I settled for a ficus. (Btw, we have to go fake up in here because our cats terrorize real plants.) I love bringing the outside in a little, and I snuck some twinkle lights in her branches to make a cozy movie night situation. She will 100% get dressed up for Christmas, of course.

Faux Ficus: Kohl's

What else to share? Oh - the lighting in this room is a GAME CHANGER. Obviously going from a medium tan to a bright cream is going to make a difference, but rearranging our lighting locations, going from 2 to 3 lamps, and working on the light settings has taken this room from gloomy day to surface of the sun. We use the Phillips Hue Lights, which are great because you can change the brightness and color, play around with different effects, and even program them to turn on and off when you'd like. (We also have them in our room and I wake up to them in the morning!) We have two of the color bulbs and one white bulb in the living room, and they make SUCH a difference!

Philip's Hue Color Bulb: Target
Philip's Hue White Bulb: Target


While I'm at it, this fireplace TV stand is fairly new. We got it in November I think? We were trying to think of something to make the long winter a little more cozy and comfy so we got this bad boy. I put it together myself! It wasn't bad. Also, the side tables are from Target as well. I don't think they have them anymore - we bought them a good handful of years ago.

Fireplace TV Stand: Target
(in the color rustic gray)

That's about it! I'm still on the hunt for some throw pillows. I don't have any now because until recently, they would get so trashed by my kids that they just weren't worth it. Aside from an occasional seasonal one, I just stopped trying. I'd also like to find new curtains, but that's been a hunt. I love the fabric of the ones we have - I'd be ecstatic to find them in white. We'll see!

- - - - -

I'm really happy with how this room turned out! We wanted to work around the couches we have, even though they are pretty rundown (they are about 18 years old and some cats have had their way with them). They are faux leather and just SO easy to wipe down with kids and pets in the house. Considering we hope to move in the near future (hopefully), we'd rather buy furniture for the home we find then. 

I know this is a small room without a whole lot of dramatic change, but it's what we're working with! We needed some more light and to simplify and sort of mature the room from its days of showcasing preschool artwork and legos. I love it so much!

Monday, March 29, 2021

Living Room Sneak Peek

Last week, I mentioned that we were working on some home projects over here. One of those projects is giving our living room a much-needed breath of fresh air. We moved into this house almost eleven years ago now (will be 11 years in May), and since then we've grown three toddler boys, a puppy, and three kittens into childhood. So, whatever your imagination is able to conjure in terms of handprints and stains and aging, multiply it by ten. My poor walls!

I've painted and organized and redecorated some things in this house over the years, but the living room has always been a neutral that was "good enough" so it's been largely overlooked. It has needed some TLC and light for a while now, and my winter-pandemic antsiness determined that it was finally time.

My idea kind of started with this picture -->

While browsing Society6 (not an ad, swear it) for pieces in this classy-kitschy style, I fell in love with this print. HAD to have it. Among a few others. 

One morning, I was sipping coffee and looking at this tired old living room of mine and thought, what if I create my update design around that print that I currently have no home for? And done.

Well that, and I've had a kid art mural hanging behind my couch for nearly a decade that I was super-over. My kids have aged out of the preschool art stage, so their little drawings either hang there for an eternity, or get recycled from years ago. It just looked too chaotic for me at this point. I've wanted it to go for a while.

So first, I asked my sister to grab me some cream, off white, and bright white paint samples the next time she went into Lowe's. Ummmmm, she delivered. My brain was basically short circuiting over the choices.

There are entirely too many cream and off white paint choices.

It took dayyyys of moving them around the room to see them in different light and against different wall art and pieces of furniture. There were many texted photos to friends for opinions. At one point, I'd narrowed it down to four choices, and then threw those four choices out and started over. What I ended up picking was initially discarded. It's chaos! This paint choosing thing. Especially where cream colors are concerned.

Matt was basically like, "just go for it my brain cannot compute."

He can't visualize like I can, so I also made him this mood collage to help him get the vibe.

Living room mood board

Our furniture is grey. Mostly a deep grey (the couches), but our recliner is lighter and our TV stand is like a woodsy-grainy grey. So my plan was to use white, cream, and off white to keep the room neutral, and then decorate with some greenery and gold/brass details.

The main wall color I chose (which is pictured behind the can of Valspar in the center) is called Pale Bloom. It's very close to white, but a bit warmer and cozier.

Painting Slop! Light Creamy Paint Color

It took me three days of painting my living room in shifts - pushing the furniture around as I went, stopping to work on school with my boys, and spray painting some of the design elements a unifying bright white. I don't remember ever being that sore! I could hardly walk on Friday, and squatting down to reach low areas on the walls was agony. But it was soooo satisfying to see the walls emerge fresh and clean and bright. I was obsessed before I even pulled the room back together.

On Saturday, I spent the entire day hanging two gallery walls (one of family photos, one of collected artwork - including the gorgeous lady pictured above). There were 23 frames/pieces of art in all!! It was a lot. Matt also helped me re-hang a shelf above the couch, which I styled. Then I rearranged the furniture a bit, reorganized our side table drawers, and replaced some of the Easter decor I'd had out before the update. I ended the night ordering new prints of some updated photos. Half of our family gallery wall is still empty while it waits for new additions.

Here are some sneaks from around the room:


Faux Tulips from Bullseye's Playground at Target


Framed watercolor by my late Grandma


Shelf Decorated with Target decor items


Small brass side table lamp from Target


Art Gallery Wall with elements from Target, Society6, and homemade pieces


I am so excited to show you the whole room! I'm waiting on a few things....the new photos for the gallery wall, a lamp shade for my taller floor lap that matches the new side table lamps, and I need a faux tree/plant for one corner of the room. I really wanted this one - it's PERFECT for the space I need it in. But of course, it's totally sold out. Sigh. I've been looking for a good dupe all over the place, but it seems like most of them have lacquered-level shine on their leaves which is just too fake looking for me. Any tips?

When I get all of those things hammered out, I'll bust out my big camera and try to do the room justice! It's so bright and fresh and ME and I'm so crazy about it so far!